Welcome! We are going to code a whole snake game. It’s going to look like this:
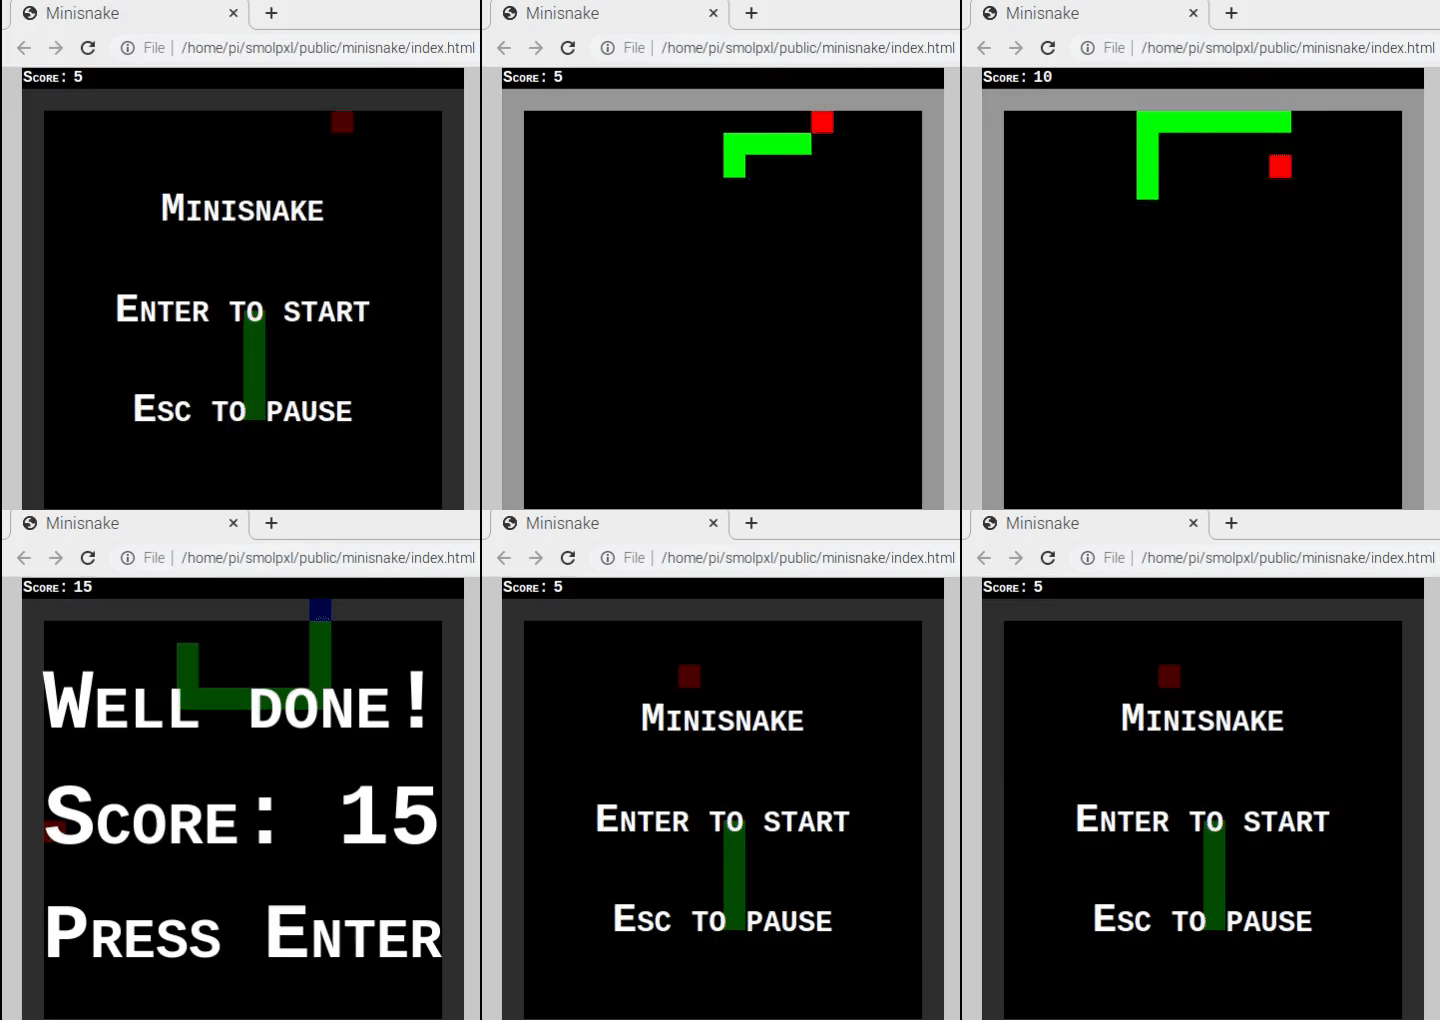
It doesn’t matter if you have never written any code before: I am going to try and explain everything from scratch.
I’m going to assume you are using a Raspberry Pi. but you don’t need one – all you need is Git, a text editor (like Notepad on Windows) and a web browser (like Firefox or Chrome or Safari or Edge). All laptops and desktop PCs should have the last two. On a tablet or phone it will be more tricky: try to use a Raspberry Pi or other computer if you can. If you are not using a Raspberry Pi, the screenshots will look a bit different, so you’ll have to do a little detective work to follow along.
For the first part where we download some code, your Raspberry Pi needs to be connected to the Internet, but once the “git clone” part is done, you can do everything else disconnected.
Follow along with the video
Before we start
If you’ve got a Raspberry Pi with Raspberry Pi OS on it, you are ready to go!
If you’re on another computer, make sure you’ve got Git installed. This should be easy on Linux, and possible on Mac or Windows.
Setting up
The first thing we need to do is download the code we are going to use to help us make a game. We’ll get it from my games web site, Smolpxl games.
Start your web browser:

type in the address: smolpxl.artificialworlds.net
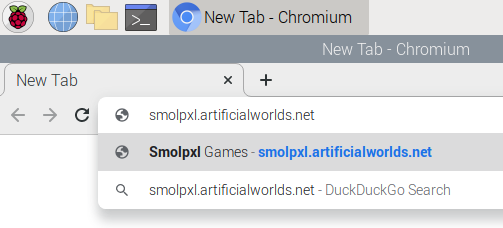
and press Enter.
Scroll to the bottom of the page and click the link “make your own games at gitlab.com/andybalaam/smolpxl“.

On the GitLab page that loads, click on Clone on the right:
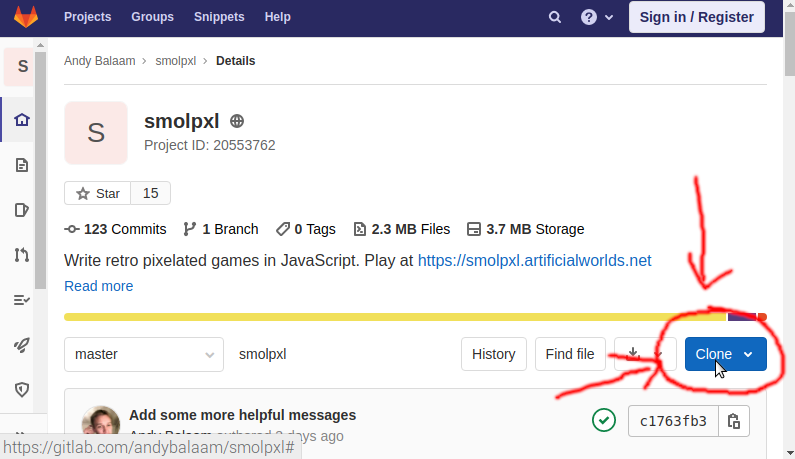
and, under “Clone with HTTPS” click the “Copy URL” button:
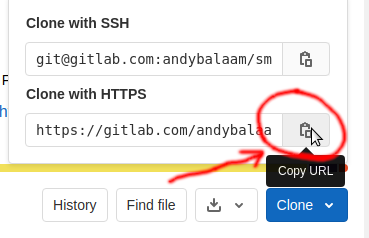
Now start the Terminal:
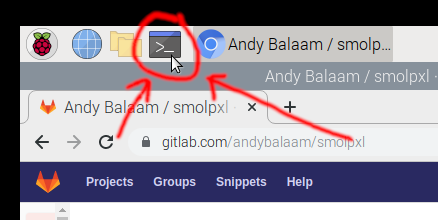
and type in “git clone” followed by a space, but don’t press Enter yet. Right-click in the Terminal and choose “Paste” to paste in the URL that we copied before.
Your Terminal should look like this:

Press Enter, and it should change to look like this:

Go to your file manager:

and double-click on “smolpxl”:
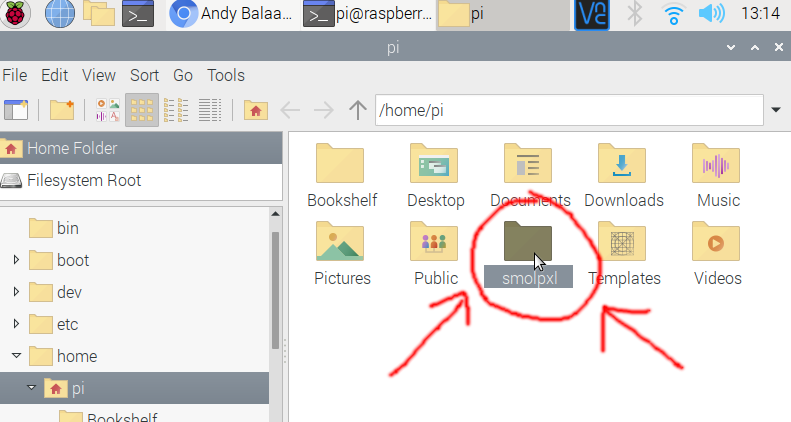
and then double-click on “public”:
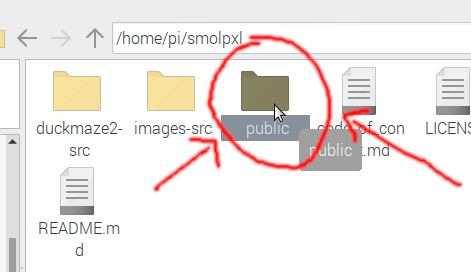
We are going to copy the “snake” folder. Right-click on it:
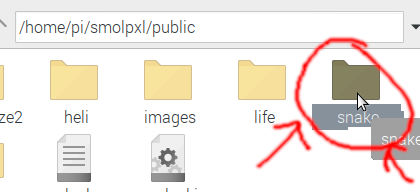
and choose “Copy”:
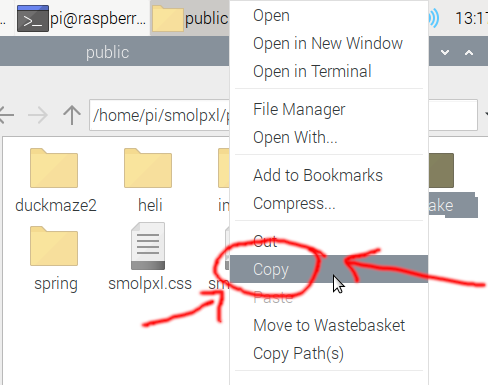
then right-click somewhere in the space below, and click “Paste”:
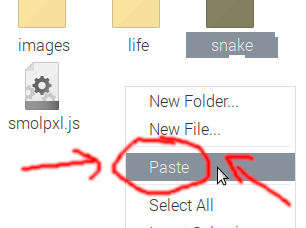
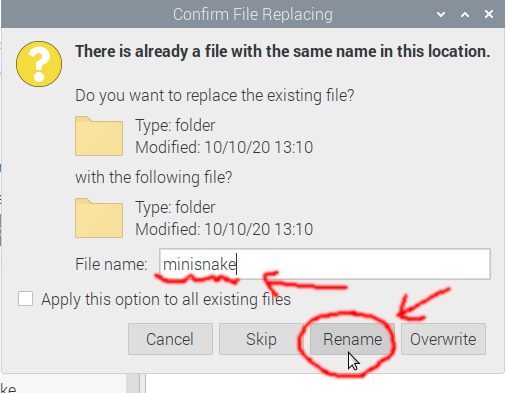
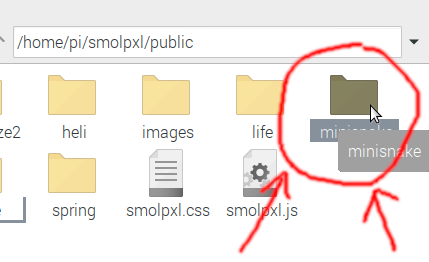
The Pi doesn’t want to paste the new one over the old one, so type a new name for it: “minisnake”, and click “Rename”:
Now go into your new minisnake folder by double-clicking on it:
We’re going to edit the file called game.js. To do this, double-click on it:
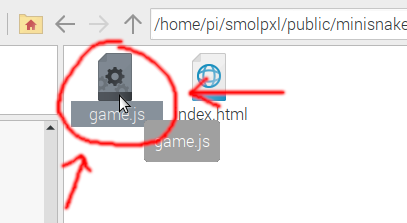
This should open the code in a text editor program called Mousepad. (If you’re not on a Raspberry Pi, you might need to right-click the file and choose “Edit”, or similar, to open it in a text editor.)
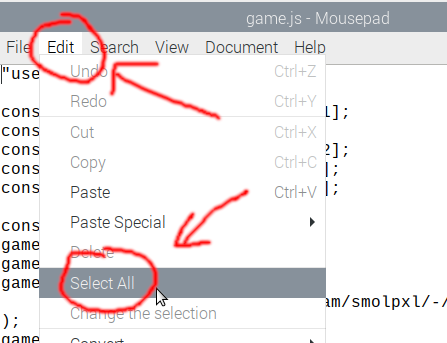
We want to delete everything in here and start again. Click “Edit”, then “Select all”:
Now press the “Delete” key, and all the code should be gone:
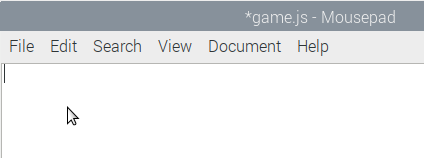
We are ready to start!
A game that does nothing
First, we’re going to type some code that gets us ready, but doesn’t actually do anything useful.
Type in this code:
const game = new Smolpxl.Game();
game.setSize(20, 20);
game.setTitle("Minisnake");

function update(runningGame, model) {
}

function view(screen, model) {
}

game.start("minisnake", {}, view, update);
This sets the size of our screen (20 by 20 squares), and a title, and gets things ready for our game. Notice that we start our game by writing game.start.
Once you’ve typed in the code:
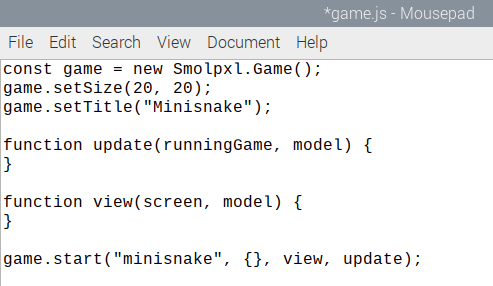
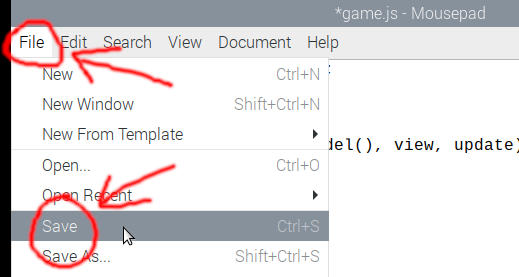
click “File” and then “Save”:
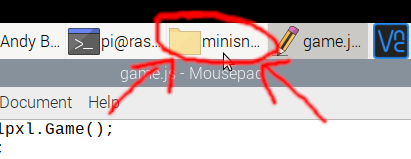
Now we’re going to try it out! Go back to the minisnake folder:
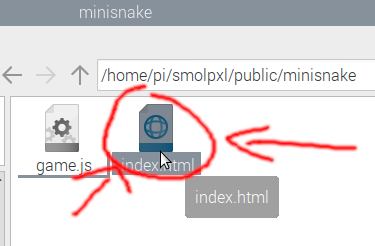
and double-click on the file called index.html:
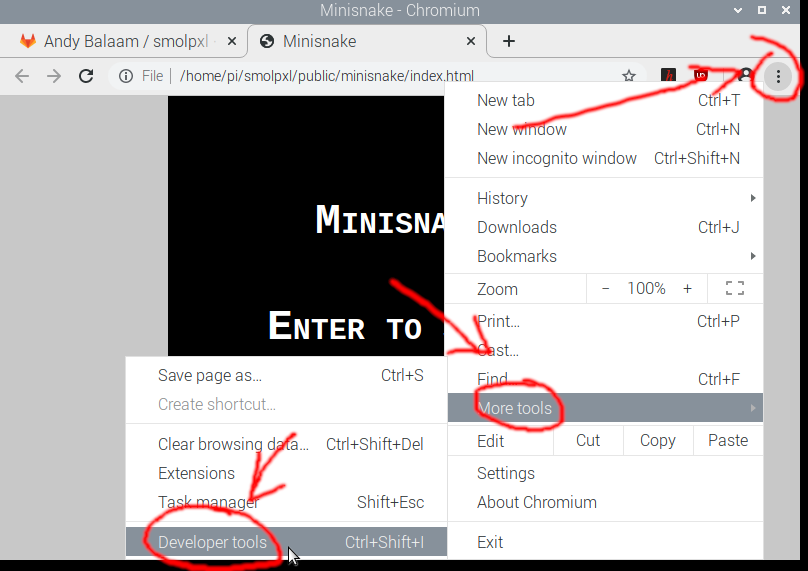
If you typed everything correctly, a title screen should appear. To figure out any problems, we will want the Developer tools open. To do that, click the three dots in the top right, then “More tools”, and “Developer tools”:
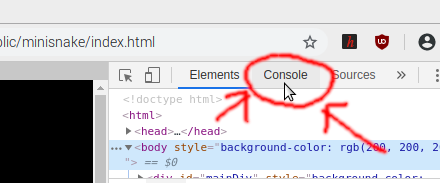
The tool we want is the Console, so click “Console” to see it:
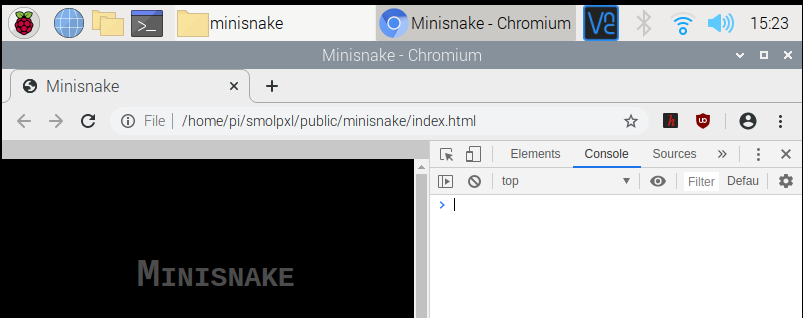
If everything went well, the Console should be empty:
If you see red error messages in the Console, you probably have a typo: double-check everything you typed, and compare it with this version: game-01-nothing.js.
Now we have everything ready to get started, and you can see our game already has a title screen!
The game is going to be made from three things:
- a model,
- a view, and
- an update function.
Let’s start with the model and the view.
The Model and the View
The first thing we’re going to do is add an apple to the game. To do that, we need to do two things:
- say where the apple is, and
- draw the apple on the screen.
To say where the apple is, we need a model. We actually already have a model, but it’s just empty.
Switch back to your code:
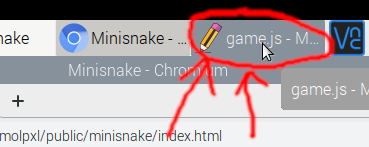
Look at the last line of code we typed, and find where you typed {}. This is the “model”, or the state of out game when we start it off. Now, we’re going to replace that with newModel(), which means call a function called newModel. (A function is a piece of code that we can re-use, and “calling” a function means running that code.)
So we’re going to write a function called newModel, and then call it. Replace the very last line of your code with this:
function newModel() {
    return {
        apple: [5, 5]
    };
}

game.start("minisnake", newModel(), view, update);
The top part makes a function called newModel, and the bottom part is the same as you had before, except {} is replaced by newModel().
Have another look at the newModel function we wrote (the top part). Can you see where we made the apple? After the word return, we have some stuff inside curly brackets ({ and later, }). When we use curly brackets like that, we are making what JavaScript calls an object. Objects have properties. So far, our object only has one property, which is called “apple”. The right-hand part, [5, 5] is how we are say where our apple is – it’s at the position 5 squares in from the left, and 5 squares down from the top of our screen.
Now we have said where our apple is, we also need to draw it on the screen. That happens inside the view function. Scroll up and find the part that says function view() and add a new line between the opening { and the closing one:
function view(screen, model) {
    screen.set(model.apple[0], model.apple[1], [255, 0, 0]);
}
We are calling a function called screen.set, which draws a square on the screen. We are passing in three things to it: two points for the position to draw, and then the colour to use. The position is model.apple[0], which means take the first part of the [5, 5] we typed before, and model.apple[1], which means take the second part. The color is [255, 0, 0] which means lots of red, and no green or blue, because this is a red-green-blue (RGB) colour.
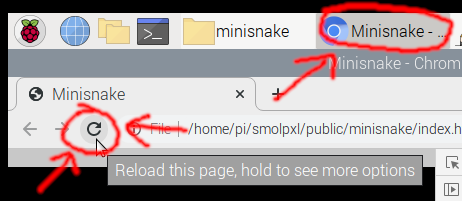
So let’s try this out and see whether the apple is drawn on the screen. First save your code in Mousepad, then switch back to our game (in Chromium), and click the refresh button to reload it.
You should see your game saying “Enter to start”. Click on it, and the game should start, and look like this:

Well done, you have drawn an apple!
If you see red error messages in the Console, you probably have a typo: double-check everything you typed, and compare it with this version: game-02-just-apple.js.
Drawing a snake
Now that we have an apple, let’s follow the exact same pattern to add a snake. We’re going to add information about it to the model, and then use that information to draw it on the screen.
First, change the newModel function to look like this:
function newModel() {
    return {
        apple: [5, 5],
        body: [[10, 10], [10, 11], [10, 12], [10, 13], [10, 14]]
    };
}
Don’t miss the extra comma at end of the “apple” line!
To give the co-ordinates of the apple, we just used one [x, y] pair. Because the snake’s body is made from 5 points, we need 5 similar pairs.
We’ve described the snake’s body position, so now let’s draw it on the screen. Update the view function so it looks like this:
function view(screen, model) {
    // Snake
    for (const [x, y] of model.body) {
        screen.set(x, y, [0, 255, 0]);
    }

    // Apple
    screen.set(model.apple[0], model.apple[1], [255, 0, 0]);
}
We have added a for loop – it runs through all the points in body, and for each one it draws a square on the screen. This time the colour is [0, 255, 0], which means the snake will be green.
(By the way, did you notice the lines we added that start with // – these are “comments” – we can write anything we like after the slashes and it doesn’t do anything. We can use comments to add notes that help us remember what different bits of our program do.
Save the file, go back to the game in Chromium and click the Refresh button again. If all goes well, you should see the snake appear:
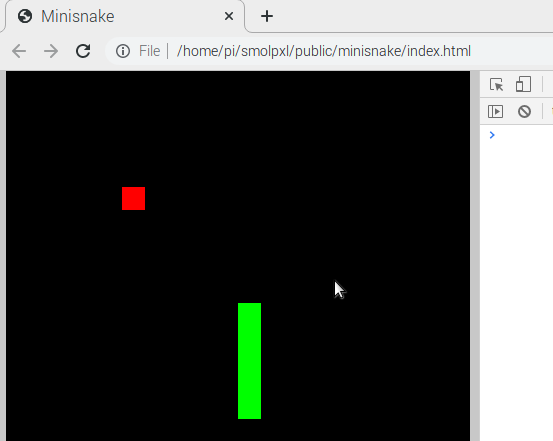
If you see red error messages in the Console, you probably have a typo: double-check everything you typed, and compare it with this version: game-03-snake.js.
So now we have a snake and an apple, but nothing is really happening … let’s fix that next.
Making the snake move
We’ve made a model in newModel and we’ve drawn it on the screen in view, but how do we make things move around? That is where the update function comes in: this is where we change the model based on what is happening.
Let’s start by making the snake move forward forever. Change the update function to look like this:
function update(runningGame, model) {
    // Move the snake
    let newHead = Smolpxl.coordMoved(model.body[0], model.dir);
    let newTail = model.body.slice(0, -1);

    model.body = [newHead, ...newTail];
    return model;
}
and change the newModel function to look like this:
function newModel() {
    return {
        apple: [5, 5],
        body: [[10, 10], [10, 11], [10, 12], [10, 13], [10, 14]],
        dir: Smolpxl.directions.UP
    };
}
Again, notice the comma at the end of the body line!
We added dir to the model, which is the direction the snake is facing.
The update function makes newHead by moving the snake’s head (the first entry in its body, which it gets with model.body[0]) in the direction it is facing (model.dir). Then we create newTail, which is everything in the old model.body except the last entry in the list (this is what .slice(0, -1) means).
Finally we update the body by setting it to [newHead, ...newTail], which just means make a new list by sticking newHead on to the beginning of newTail.
Save, switch to the game in Chromium, and refresh. Because we set dir to Smolpxl.directions.UP inside newModel, the snake moves updards!
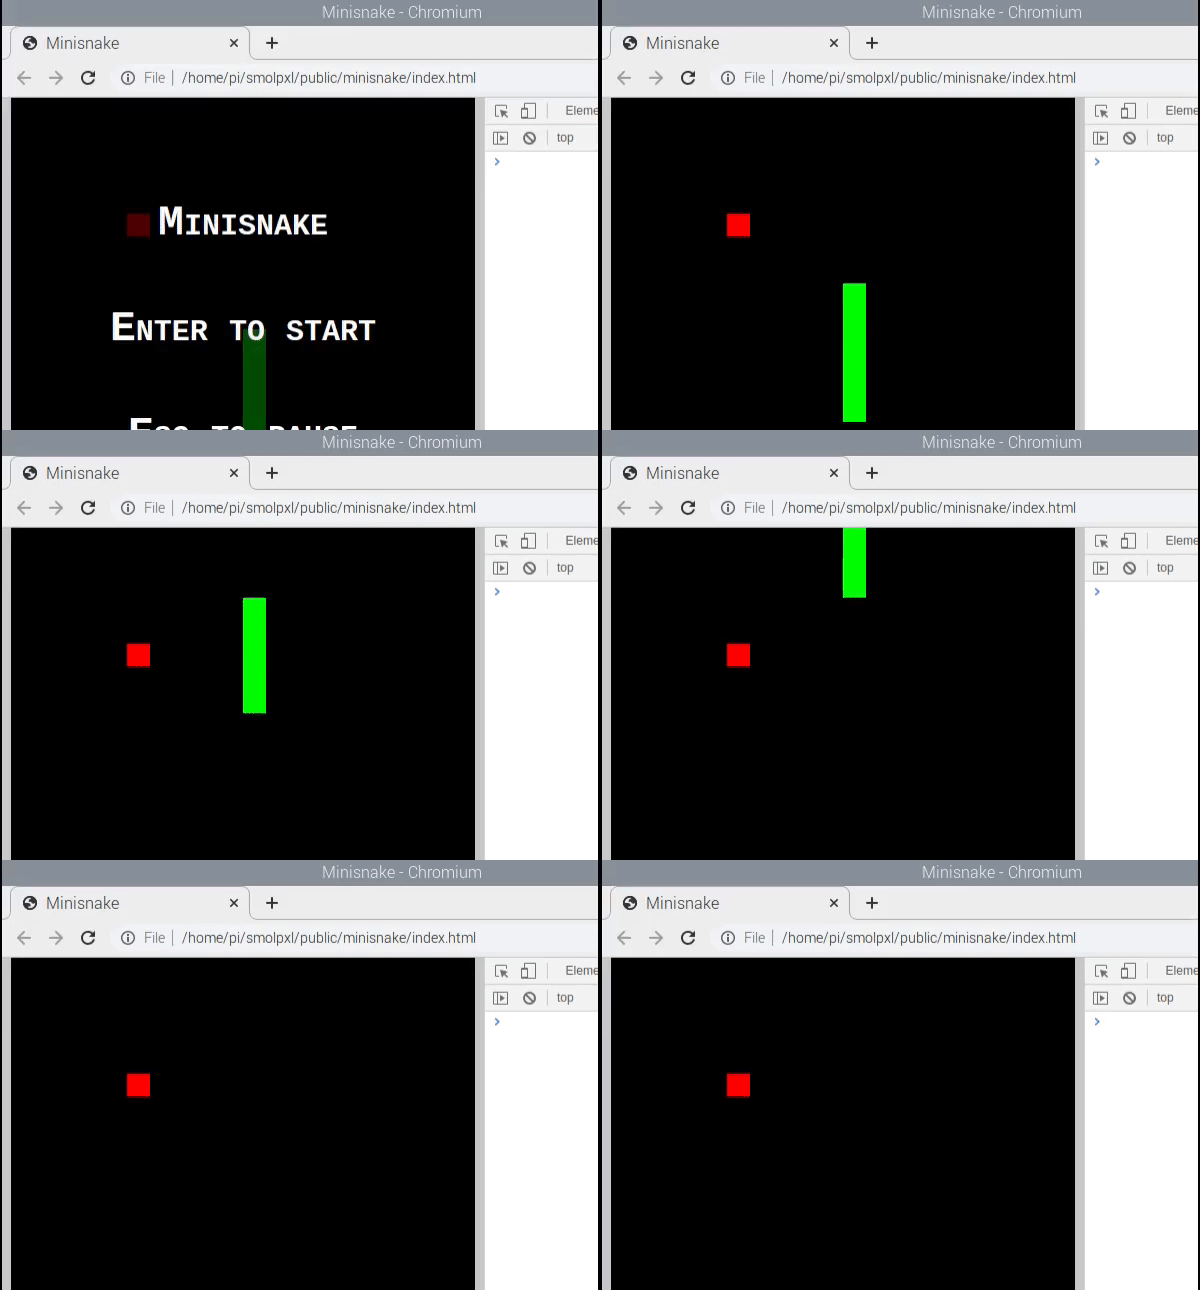
If you see red error messages in the Console, you probably have a typo: double-check everything you typed, and compare it with this version: game-04-movement.js.
If the snake disappears off the top, click the refresh button to see it again.
The game isn’t too much fun yet. Let’s add some keyboard controls, and allow you to die when you go off-screen.
Controlling the snake
The update function moves the snake, but now it’s time to make it a bit cleverer, by changing direction when you press a key, and stopping you when you go off-screen. Change it so it looks like this:
function update(runningGame, model) {
    if (!model.alive) {
        return;
    }

    if (runningGame.receivedInput("LEFT"))  {
        model.dir = Smolpxl.directions.LEFT;
    } else if (runningGame.receivedInput("RIGHT")) {
        model.dir = Smolpxl.directions.RIGHT;
    } else if (runningGame.receivedInput("UP")) {
        model.dir = Smolpxl.directions.UP;
    } else if (runningGame.receivedInput("DOWN")) {
        model.dir = Smolpxl.directions.DOWN;
    }

    // Move the snake
    let newHead = Smolpxl.coordMoved(model.body[0], model.dir);
    let newTail = model.body.slice(0, -1);

    // Die if we hit the edge
    if (
        newHead[0] === runningGame.screen.minX ||
        newHead[0] === runningGame.screen.maxX ||
        newHead[1] === runningGame.screen.minY ||
        newHead[1] === runningGame.screen.maxY
    ) {
        model.alive = false;
    }

    model.body = [newHead, ...newTail];
    return model;
}
and change the newModel function to look like this:
function newModel() {
    return {
        alive: true,
        apple: [5, 5],
        body: [[10, 10], [10, 11], [10, 12], [10, 13], [10, 14]],
        dir: Smolpxl.directions.UP
    };
}
We keep track of whether the snake is alive in the model, and we immediately return from update if we are dead, meaning the snake stops moving. (The ! in if (!model.alive) means “not”, so we are saying what to do when we are not alive – when we are dead. The return here means immediately stop running the code in this function.)
The next new part of update allows us to check whether an arrow key was pressed (using the runningGame.receivedInput function), and if so, change the direction of the snake (model.dir).
Finally, nearer the end of update, we check whether the position of the snake’s head (newHead) is at one of the screen edges, by comparing its co-ordinates with the maximum and minimum co-ordinates on the screen. If we are off the edge, we set model.alive to false, meaning the snake is now dead.
Save, switch to the game in Chromium, and refresh. With all that, we can control the snake with the arrow keys, and it can die:
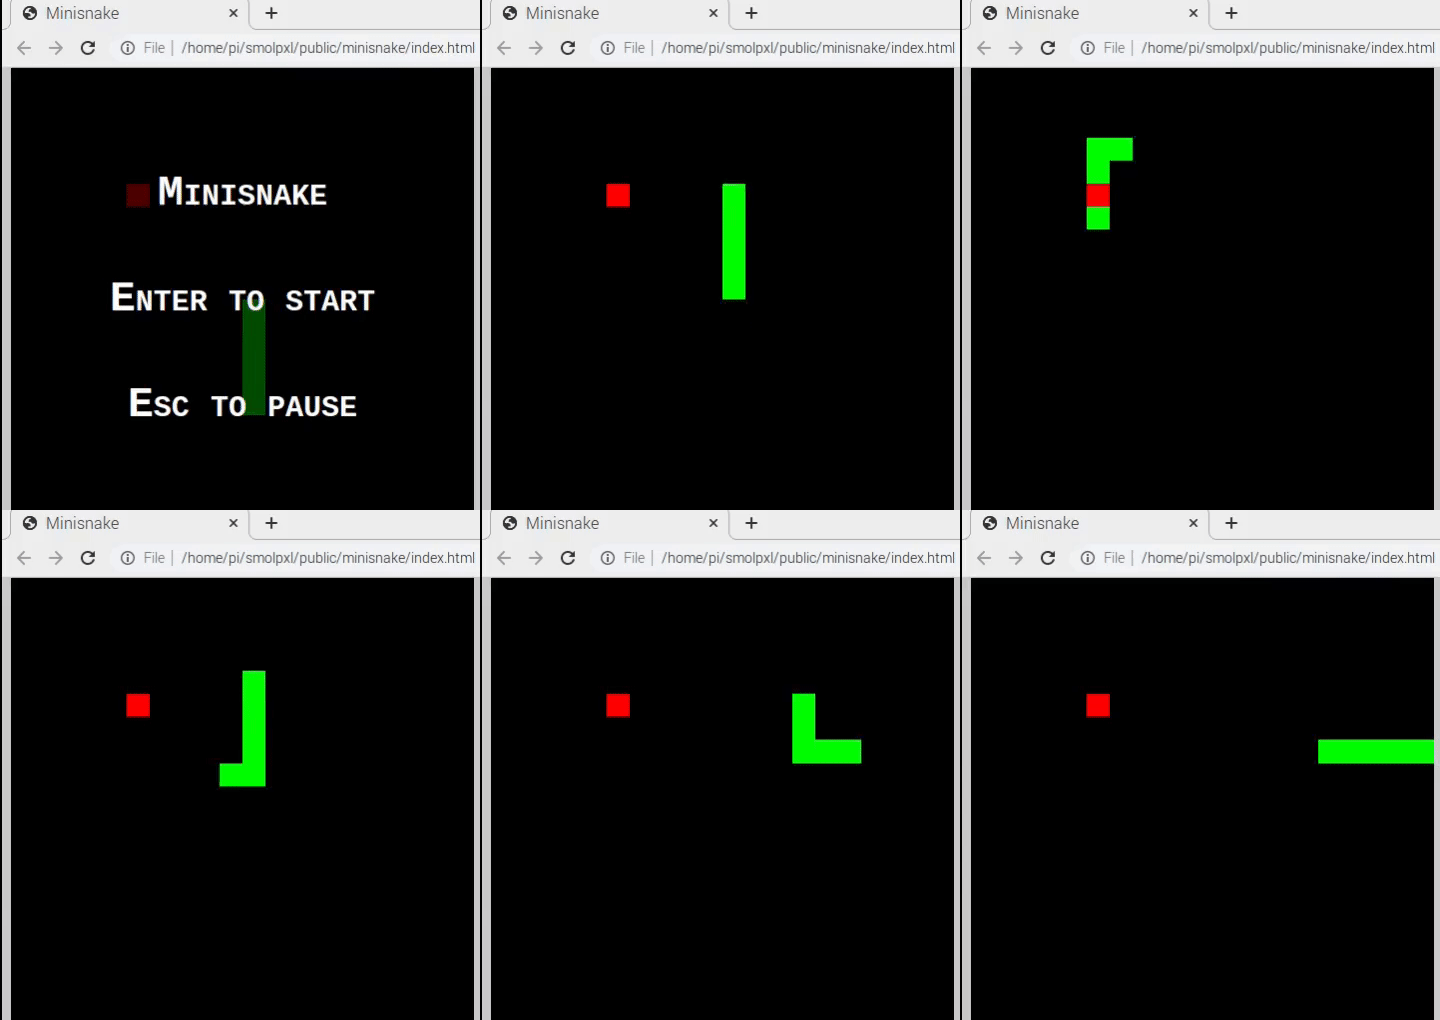
Try clicking on your game and then pressing the arrow keys to control the snake.
If you see red error messages in the Console, you probably have a typo: double-check everything you typed, and compare it with this version: game-05-control.js.
This is kind-of a game, but surely it’s time to eat some apples?
Eating apples
If we’re going to be eating apples, they should probably not always be in the same place, right?
Let’s start off by making a brand new function. Make some space immediately above the update function, and type in this code:
function randApple() {
    return [Smolpxl.randomInt(1, 18), Smolpxl.randomInt(1, 18)];
}
This function gives us some random co-ordinates where we can place an apple. Update newModel to place the first apple at a random place, by making it look like this:
function newModel() {
    return {
        alive: true,
        apple: randApple(),
        body: [[10, 10], [10, 11], [10, 12], [10, 13], [10, 14]],
        dir: Smolpxl.directions.UP
    };
}
So instead of writing the exact co-ordinates we want ([5, 5]), now we’re calling our new randApple function, which gives us back some random co-ordinates.
Now we can place apples randomly, let’s change the update function to allow us to eat apples. While we’re there, let’s check whether we crashed into our own body too:
function update(runningGame, model) {
    ... All the same stuff as before ...

    // Die if we hit the edge
    if (
        newHead[0] === runningGame.screen.minX ||
        newHead[0] === runningGame.screen.maxX ||
        newHead[1] === runningGame.screen.minY ||
        newHead[1] === runningGame.screen.maxY
    ) {
        model.alive = false;
    }

    // If we hit the apple we get longer
    if (Smolpxl.equalArrays(newHead, model.apple)) {
        for (let i = 0; i < 5; i++) {
            newTail.push([-1, -1]);
        }
        model.apple = randApple();
    }

    // If we hit our own body, we die
    if (Smolpxl.arrayIncludesArray(newTail, newHead)) {
        model.alive = false;
    }

    model.body = [newHead, ...newTail];
    return model;
}
We use the Smolpxl.equalArrays function* to ask whether the new position of the snake’s head (newHead) is the same as the position of the apple (model.apple).
* The function is called “equalArrays” because both newHead and model.apple are lists of two co-ordinates (x and y), so we are storing them inside JavaScript “arrays”. You can spot an array because it is surrounded by square brackets ([).
If the head is on top of the apple, we do two things: add new items to the end of newTail, by using a for loop that runs 5 times. Each time it runs, it uses push to add another body part on the to the tail. (It actually adds an off-screen point [-1, -1] every time – this means they won’t get drawn at first, but as the snake moves forward, they will gradually get replaced by on-screen points, and we’ll see the snake gradually get longer.)
The second thing we do if the head is on the apple is move the apple by setting model.apple to another random point given to us by randApple.
We also check whether we have hit our own body using the Smolpxl.arrayIncludesArray function (asking whether newHead is the same point as one of the points in newTail) and set model.alive to false, meaning we’re dead, if so.
Save, switch to the game in Chromium, and refresh. Now we can really play a game of snake!
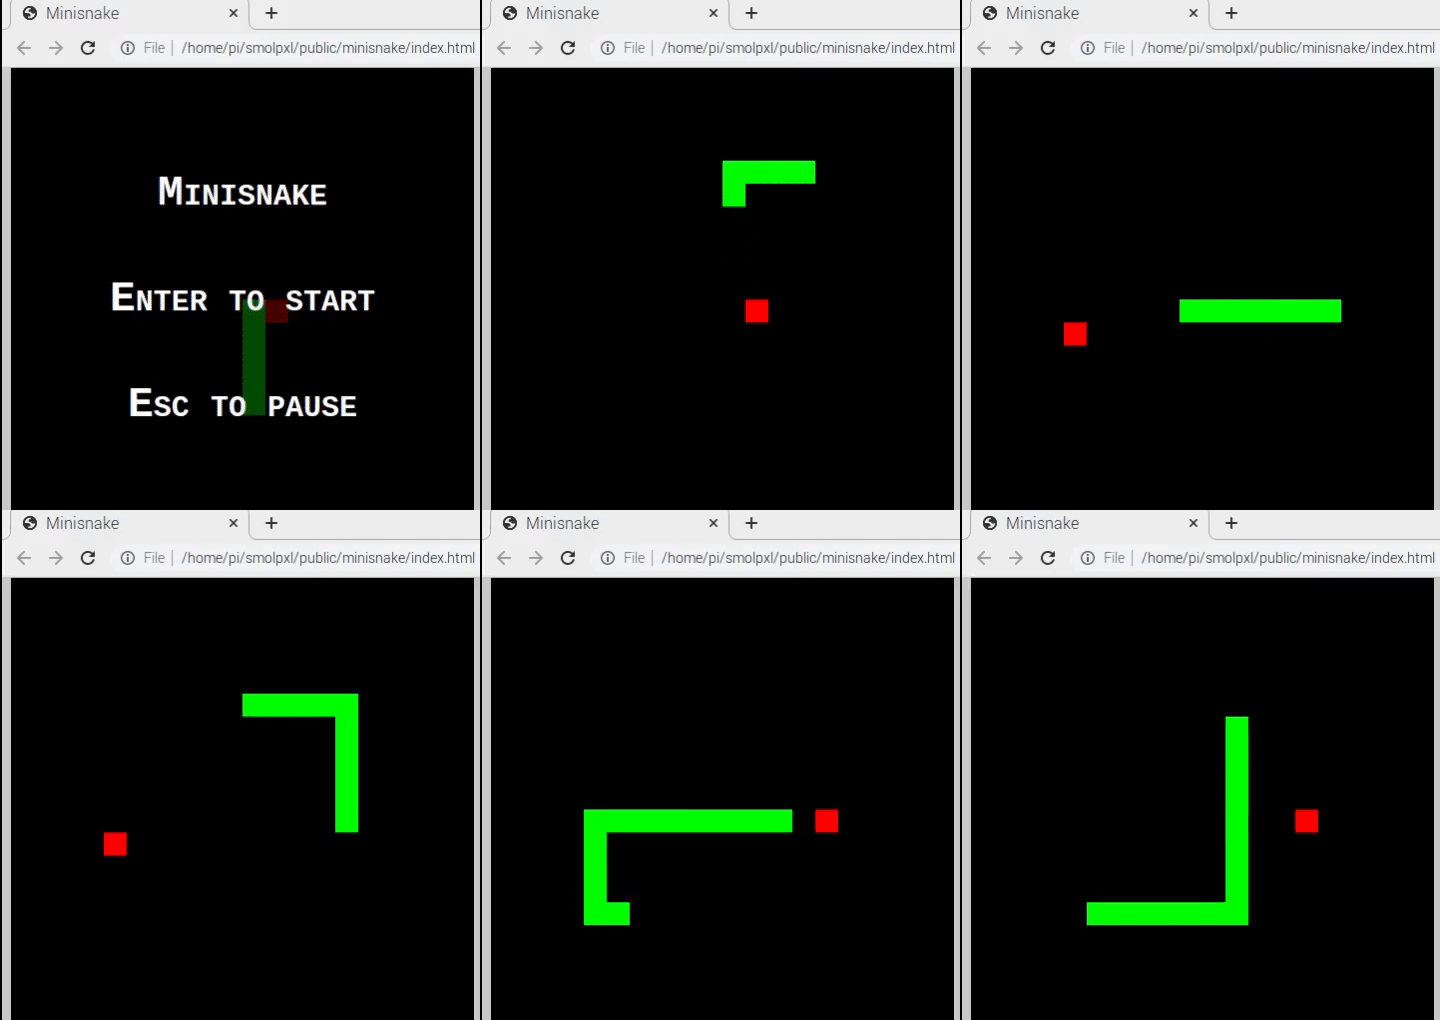
If you see red error messages in the Console, you probably have a typo: double-check everything you typed, and compare it with this version: game-06-eating-apples.js.
We are nearly done. The last jobs are to make the game look a little nicer, and handle starting a new game after we crash.
Finishing off
We need to draw the walls around the edge that you crash into, and it would also be nice to show your score at the top of the screen. We can do both of these by adding a bit more at the beginning of the view function:
function view(screen, model) {
    screen.messageTopLeft(`Score: ${model.body.length}`);

    // Walls
    for (const x of screen.xs()) {
        screen.set(x, screen.minY, [150, 150, 150]);
        screen.set(x, screen.maxY, [150, 150, 150]);
    }
    for (const y of screen.ys()) {
        screen.set(screen.minX, y, [150, 150, 150]);
        screen.set(screen.maxX, y, [150, 150, 150]);
    }

    ... All the same stuff as before ...
}
We use the screen.messageTopLeft function to display a message at the top. To format the message we write some text inside backticks (`), which allows us to substitute values in. Here we typed ${model.body.length}, which means our score is how many points there are inside our body (which is the length of the array model.body). The ${} part just means “substitute this value in here”.
We make use of the screen.xs() and screen.ys() functions that give us a list of all the x and y co-ordinates on the screen to draw the wall.
Save, switch back to the game, and refresh to see how this looks. If you want to check what you have typed so far, compare it against game-07-walls-and-score.js.
The very last thing we need to do is handle restarting the game after we crash.
First, let’s display a message on the screen by updating the view function one last time:
function view(screen, model) {
    ... All the same stuff as before ...

    // Snake
    for (const [x, y] of model.body) {
        screen.set(x, y, [0, 255, 0]);
    }

    // Death
    if (!model.alive) {
        screen.set(model.body[0][0], model.body[0][1], [0, 0, 255]);
        screen.dim();
        const score = model.body.length;
        screen.message(["Well done!", `Score: ${score}`, "Press <SELECT>"]);
    }

    // Apple
    screen.set(model.apple[0], model.apple[1], [255, 0, 0]);
}
When the snake is not alive we draw a blue dot ([0, 0, 255]) where its head is, then make the screen dark with the screen.dim function, and write a message on the screen with the screen.message function.
Last, if we press Enter while the death message is visible, we want to go back to the start. We can do that with a small change to the update function:
function update(runningGame, model) {
    if (!model.alive) {
        if (runningGame.receivedInput("SELECT")) {
            runningGame.endGame();
            return newModel();
        } else {
            return;
        }
    }

    if (runningGame.receivedInput("LEFT"))  {
    ... All the same stuff as before ...
Notice that we deleted the line that just said return; and replaced it with the new if code. We check whether the user pressed the SELECT button (which means the Enter key) and if so, we tell Smolpxl to go back to the title screen by calling runningGame.endGame, and then we reset everything in the model by returning newModel().
Save, switch to the game in Chromium, and refresh. Our game is finished!

If you see red error messages in the Console, you probably have a typo: double-check everything you typed, and compare it with this version: game-08-finished.js.
Well done!
If you got that working, you should be extremely pleased with yourself. Typing all that code correctly is a major challenge, and your determination has paid off.
Take a breath, and have a think about whether you can show what you’ve done to someone else. I’m pretty sure they will be impressed that you coded an entire game!
Challenges
When you’ve properly taken the time to enjoy the great work you’ve done, try reading through the code, and reading back through this blog post to try and understand how the program works.
To learn more about JavaScript and making web sites, you can follow this much more comprehensive tutorial: Getting started with the Web.
You’ve done really well. If you want an extra challenge, try improving your game using these challenges. Bear in mind though, working these out on your own will be much harder than what we’ve done so far:
- Challenge 1: Display a different message if you don’t eat any apples. If you crash before eating any apples, you might need some extra encouragement: change the part of the view function where we display a “Well done!” message, and if our score is 5 (if (model.body.length === 5) then display a different message – maybe “Bad luck!”. Look for if … else statements we have already written, to see how they work.
- Challenge 2: Prevent going back on yourself. Update your code so that when snake is going right, and the user presses left, we ignore it. You will need to change the update function, where we use receivedInput to check what key the user pressed. Instead of just setting the direction, you will need to add a new if statement that check what direction we are facing already.
- Challenge 3: Remember the high score. Remember the best score anyone has got, and display it at the top-right of the screen. At the moment in our code, we return newModel(); in update, when we want to restart the game. That means we have a totally fresh model, forgetting everything else that happened before. If we want to remember a high score, we can’t do that! If you want some extra inspiration, have a look at the more complete version of snake that comes with the Smolpxl games. It’s actually included in the code you downloaded with the git clone command you typed at the very beginning.
What next?
To learn more, try:
- Reading the Smolpxl code that you downloaded at the beginning with git clone. Inside the public folder there are several games to look at, including a more complete version of snake!
- Following my video series making Smolpxl games.
- Doing more JavaScript using my video Snowflake Christmas card web page on the Raspberry Pi.
- Joining the Smolpxl community by clicking on “Community” at the top of smolpxl.artificialworlds.net.
- Writing a new Smolpxl game! If you like it, send it in to be part of Smolpxl, by creating an issue at gitlab.com/andybalaam/smolpxl/-/issues.
- Following the tutorial here: Getting started with the Web.
- Searching for “JavaScript tutorial” on the Internet, or on your favourite video site.
Remember to have fun, and be kind to the people you meet on the way.
 Code your first game: Snake in JavaScript (on Raspberry Pi)